- Home
- History
- Maintenance
- Modifications
- Gallery
Fuel Filter Replacement
Parts Needed
Toyota Fuel Filter #23300-62030
Tools/Supplies Needed
Goggles and latex gloves
Rachet with 6" extension
10mm deep socket
14mm Crow's Foot Wrench
Old Rags
Bucket or oil pan
Rachet with 6" extension
PB Blaster
Summary
Contrary to claims by Toyota, fuel filters are NOT liftetime parts. Ok, this is anecdotal information based on members from Yotatech and other forums who have experienced dramatic changes in their vehicle's acceleration and throttle response. Not to mention, cleaner fuel running through your fuel delivery system.
It's a relatively simple, inexpensive change and can be done in less than one hour. The only difficult part seemed to be getting off the compression fittings within the tight confines under your 4runner.
Step 1: Locating the Fuel Filter
For whatever reason, people seem to have a hard time finding this little bugger. Look at the pictures below. The fuel filter is located on the driver's side of the vehicle. In fact, the area under the steering wheel is almost directly above the fuel filter.
Imagination aside, the fuel filter sits just inside the driver's side frame rail, slightly behind the front crossmember and slightly to the left of the driveshaft and the front transfer case (if you have 4WD).

(X) marks the spot

Here's the fuel filter itself (F)
Step 2: Depressurizing and Removing the Fuel Line Compression Fittings
First, put on your goggles or any other kind of eye protection. You'll thank me for it later. Begin by opening your gas cap to partially depressurize your fuel line. Of note, if you want to fully depressurize the fuel lines, take out the pump fuse and start the engine. This is optional and does not need to be done, but just for your reference.
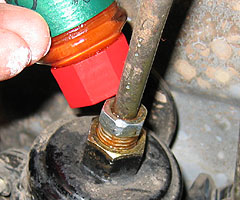
Next, spray a good amount of penetrant on the compression fitting threads to start the loosening process. I found on my 4runner that the front one was the most difficult of the two because of the tight space not allowing for good leverage. I positioned myself to work on the front compression fitting by working from the front of the cross member. Much easier.
Grab the front fuel line for stability and loosen the front compression fitting. Using a 14mm crow's foot wrench w/ a rachet is the best tool for the job, but I got by with a regular 14mm combo wrench. Next, remove the rear compression fitting and then pull both fittings back *away* from the fuel filter.

Tabasco sauce works great to loosen tight bolts.
Step 3: Removing the Fuel Filter Mounting Screws and Fuel Filter
When you remove either of the fittings, you will see that the fuel will start to drip and/or spill out. Place your bucket underneath the fuel filter and let it drain until there's a slow drip. If you give it a few good shakes, more should come out.
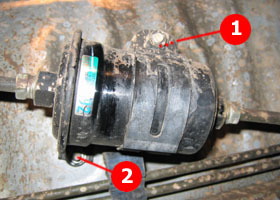
Save yourself some headache and go find your 6" ratchet extension. Put a deep 10mm socket on the end of the extension and rachet and remove the two mounting screws. The 6" extension will allow you to rotate the rachet at full circles vs tiny little ones.
Shake the fuel filter loose. At this point, alot of fuel will drip out. More than you probably expect. It's completely normal so just shake it loose and then put in a safe place away from flames to drain.

Screw (1) is located BEHIND the visible screw shown in this picture. Screw (2) is plainly visible.
Step 4: Mounting the Fuel Filter
One common question is "proper orientation of the fuel filter." Looking at the top and bottom of the filter, it is stamped either "In" or "Out". The "In" side faces the rear part of your 4runner while the "Out" side faces your engine.
Put both ends of the fuel lines into the fuel filter. Move and mount the fuel filter upwards and then screw in the mounting threads loosely until it can hold the weight of the fuel filter. Now adjust the fuel lines until they are perfectly seated in the fuel filter and then slightly tighten down the compression fittings. Alternate tightening all the screws by hand until the fuel filter is seated correctly. Only then should you fasten down the pair of compression fittings and mounting screws with your 14mm wrench and 10mm deep socket, respectively.

The "in" side (I) faces the rear while the "out" side faces the engine.